-
Turn off these features for VR:
-
Temporal AA (Use FXAA)
-
Motion Blur
-
Lens Flare
-
Depth Of Field
-
Bloom Dirt Mask
-
Vignette Intensity
-
Turn off smoothframerate
-
Stereo rendering does not work in Editor viewports or PIE mode; must use Standalone Game mode
-
Rift only supported on Windows
-
Useful links for Oculus + UE4:
-
Oculus Wiki Page: https://wiki.unrealengine.com/Oculus_Rift
-
Separate Player movement orientation from HMD orientation https://wiki.unrealengine.com/Oculus_Rift_Separate_View
-
Blueprints related to HMD https://wiki.unrealengine.com/Oculus_Rift_Blueprint
-
Useful Console Commands
-
stereo show: Print list of settings to log
-
stereo on/off: Turn on/off stereo for any game. Rift must be plugged in
-
stereo reset: Resets IPD and clears stereo overrides
-
stereo e=<value>: Sets IPD
-
hmd enable/disable: Enable/Disable HMD
-
hmd sp 100: Sets HMD Screen Percentage
-
hmd vsync on/off/reset: Self-explanatory
-
ovrversion: Prints LibOVR version
-
Useful Oculus Config settings & console commands are all defined in OculusRiftHMD.cpp: bool FOculusRiftHMD::Exec( UWorld* InWorld, const TCHAR* Cmd, FOutputDevice& Ar )
void FOculusRiftHMD::LoadFromIni()
- Oculus Config settings are in the DefaultEngine.ini file ([root]/Config/DefaultEngine.ini)
[Oculus.Settings]
; In meters, not Unreal Units (cm)
; Recommended for true first person viewpoint
; since you are simulating the head.
;HeadModel_v2=(X=0.0,Y=0,Z=0.0)
; Default values
HeadModel_v2=(X=0.12,Y=0,Z=0.17)
bChromaAbCorrectionEnabled=true
bMagEnabled=true
bDevSettingsEnabled=false
bMotionPredictionEnabled=true
bTiltCorrectionEnabled=true
AccelGain=0.0
MotionPrediction=0.04
bOverrideIPD=false
IPD=0.064
bOverrideStereo=false
ProjectionCenterOffset=0.0
LensCenterOffset=0.0
FOV=90.0
bOverrideVSync=false
bVSync=true
bOverrideScreenPercentage=false
; Value is out of range [30..300]
ScreenPercentage=100.0
bAllowFinishCurrentFrame=false
PositionScaleFactor=1.0
; Defaults to true if DLL built with OVR_VISION_ENABLED defined.
; Positional tracking for DK2 onwards perhaps?
bHmdPosTracking=false
bLowPersistenceMode=false
; Defaults to true.
; If enabled, viewpoint rotation is updated during the render thread.
; Depending on how you control a players view rotation, you may need to disable this.
bUpdateOnRT=true
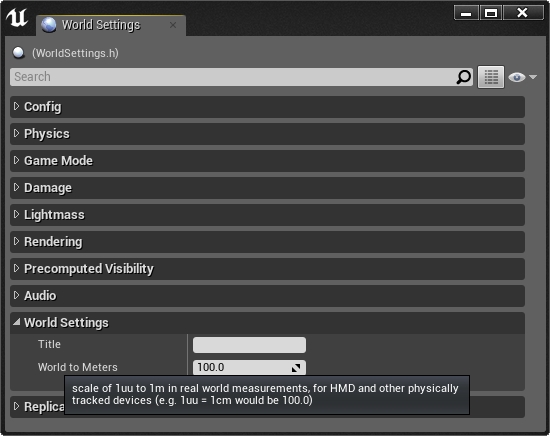
- World Scale can be changed in Window->World Settings. Default is 100 uu => 1m (i.e. 1 uu = 1cm)
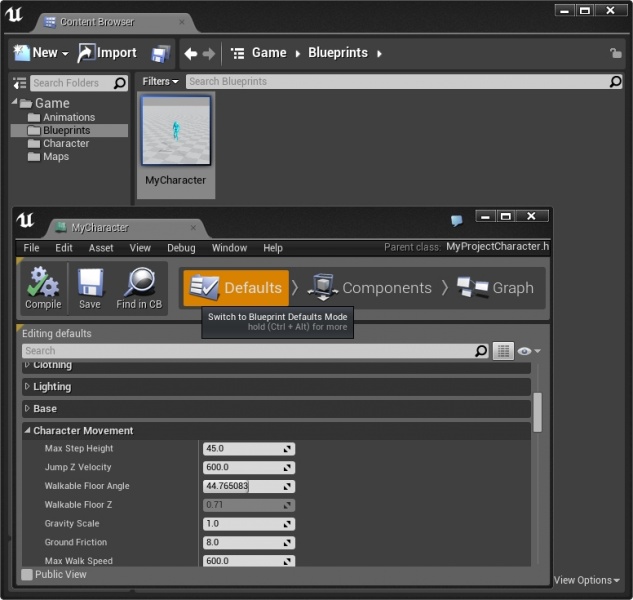
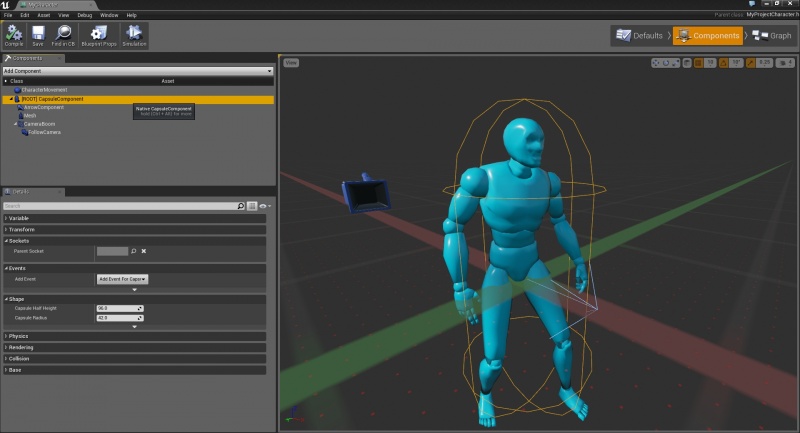
- Player Settings: Can be changed in the Defaults or Components of your characters BluePrint
-
Height & Width are based off Capsule Half Height & Capsule Radius
-
Virtual Head Model:
By default, a virtual head model will be used to offset the players viewpoint.
For a traditional first person viewpoint that rotates on a central axis, this is fine.
For a true first person viewpoint that is already positioned at the location of the players eyes, this extra offset is unnecessary.
Similarly so for most third person viewpoints.
The dimensions of this virtual head model are determined by the HeadModel_v2 config setting.
-
First of all, be sure to use the rift as recommand (by Oculus VR) as an extended monitor (not in clone mode, as it breaks things like vsync).
-
[Disable the "Aero" Windows desktop composition engine. Right-click on your desktop, click "Personalize" and then select one of the "Basic" or "Classic" themes instead of an "Aero" theme.] I did not bother to measure impact about this; does anyone did?
-
Then, launch the game in standalone mode, without opening the Editor. Right click in you project ".uproject" file and hit "Launch game". This helps a lot!
-
By then, you would run the game in default graphic config, that is "Epic mode"! This is a big problem here! You should tweak scalability parameters from Epic to High, at least. Read [this official post to learn about its effect on Editor mode] then read [my expl``anation on how to make this dynamic into your standalone game using blueprints]
From https://forums.unrealengine.com/showthread.php?3822-UE-4-and-Oculus-Rift-Framerate-Optimization
Regarding cloning multiple monitors, I personally had the best performance with cloning enabled, and my game running in fullscreen mode, instead of running with my desktop extended and the game running in a "fullscreen" window.
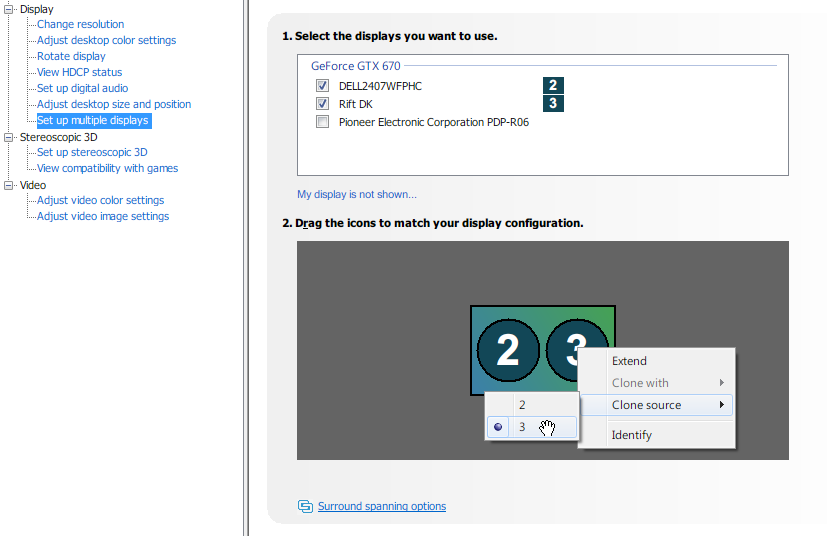
But to make vsync work (so that the Rift doesn't inherit the vsync timing of your primary monitor), at least with an Nvidia card, you can set the Rift as your clone source in the Nvidia Control Panel (#3 is my Rift in the screenshot below). This way the Rift's refresh timing will be used for vsync and you won't see any tearing on your headset, although if you primary monitor timing is even slightly different (probably the case) you will still see tearing on the primary monitor. Of course this shouldn't be a problem since only other people in the room will see your primary monitor while your Rift is on your head.
From https://forums.unrealengine.com/showthread.php?3822-UE-4-and-Oculus-Rift-Framerate-Optimization
Guide to getting good FPS and quality in UE4 demos using DistortionScale and ScreenPercentage#
tl;dr: The DistortionScale parameter trades off FOV and image quality. The ScreenPercentage parameter trades off FPS and image quality. Here's how to set them both.
UPDATE: Now available in video form, see:[/r/oculus/comments/24lkxz/getting_good_fps_and_quality_in_ue4_demos_on/]
I did some digging into the Oculus plugin in the UE4 source, and came up with the following strategy which will enable you to get a rock-solid 60 FPS in UE4 demos, while also getting the highest visual fidelity your GPU can handle. Be careful to follow the steps and not skip any.
1) If you've messed with your GameUserSettings.ini file, change the following settings back:
ResolutionSizeX=1280
ResolutionSizeY=800
bUseDesktopResolutionForFullscreen=False
FullscreenMode=0
The following steps will work at higher resolutions, but results will not be as good.
2) Start up the demo. If you're not already in stereo mode, do ~ to enter the console and then "stereo on".
3) Put on your Rift and type the following to pop up an FPS monitor in your view:
stat fps
Find the most complex scene in the demo exhibiting the poorest frame rate for testing. If your frame rate is good throughout, increase your ScreenPercentage with "hmd sp 200" or "hmd sp 300" and try again.
4) Enter the console with ~ and type the following commands:
oculusdev on
hmdwarp 1=1
These commands have no apparent effect, but unless you do both of them, the command in the next step will have no effect (the second command is a workaround for a bug).
5) Set your DistortionScale to 0.5 using "hmdwarp s=0.5". This should cause your view in each eye to shrink to a small rectangle. Increase it gradually by 0.1 (e.g. "hmdwarp s=0.6") until you can no longer see black around the image. For me this happens around 1.3. (If you wish, you can fine tune it by increments of 0.01 at this point). The UE4 default is 1.715, which is really high.
This parameter setting does not affect your frame rate at all, but does improve image quality dramatically. Once you've found a DistortionScale parameter you like, you can reuse it in every demo - it only depends on your vision and how close you put your eyes to the lenses.
You will need to repeat steps 4 and 5 each time you run the demo. DistortionScale cannot currently be set in Engine.ini, and I don't know if it can be set programmatically. It might be possible to bind a key.
6) ScreenPercentage varies between 30 and 300, and determines the resolution of the offscreen buffer. Start it at 30 with "hmd sp 30". Wait for 10-20 seconds for your "stat fps" reading to climb to a maximum value. Your frame rate should be maxed out, but the image will look terribly blurry.
Increase it in steps of 10 while watching your frame rate (e.g. "hmd sp 40") - once your frame rate drops below your refresh rate, take it back down by 10 and you are done. If you later encounter frame drops, you can bring it down a little more.
If you're not happy with your image quality at this point, you may wish to slightly decrease DistortionScale as in step 5, which will reduce FOV but give you more image quality in return.
Very high ScreenPercentage values (e.g. in the 150-300 range) result in SSAA behind the scenes, and are roughly equivalent to running a Unity Rift demo at a higher screen resolution. This is why I said not to use a higher resolution in step (1).
If you close the demo normally, it will save your modified ScreenPercentage to your Engine.ini file automatically, and you will not have to repeat this step.
7) Hide your FPS again with "stat fps".
That's it! I've tried this on both the Starship Bridge Demo (for which I got ScreenPercentage up to 250 on my GTX 780 Ti) and UE4EffectsCave (I got up to 130). Let me know what kind of results you get!
From http://www.reddit.com/r/oculus/comments/24g92u/guide_to_getting_good_fps_and_quality_in_ue4